Introduction
Effective PC cooling is essential not only for maintaining optimal performance but also for ensuring the longevity of your hardware components. As modern processors and GPUs become more powerful, they generate increased heat, which, if not managed properly, can lead to thermal throttling, reduced efficiency, and even hardware damage over time.
This article provides an overview of the various cooling technologies and solutions available, helping you understand how to keep your PC running cool and stable—whether you’re gaming, creating content, or working on demanding professional tasks.
Why Proper Cooling Matters
Effects of Overheating on CPU, GPU, and Other Components
When your CPU, GPU, or other components run too hot, it can cause immediate and long-term issues. Excessive heat can degrade the delicate internal circuits, leading to hardware malfunctions or permanent damage. Over time, sustained high temperatures accelerate wear, reducing the lifespan of your PC parts.
Thermal Throttling Explained
To protect themselves from damage, modern CPUs and GPUs have built-in safety features called thermal throttling. When temperatures reach critical levels, the hardware automatically reduces clock speeds and voltage to lower heat output. While this prevents hardware failure, it significantly reduces performance, causing frame rate drops, stuttering, and slower processing.
How Cooling Affects System Stability and Lifespan
Good cooling solutions maintain component temperatures within safe operating ranges, ensuring consistent performance without throttling. Stable temperatures also improve system reliability, preventing random crashes or freezes. Furthermore, keeping components cool slows down thermal wear, helping your PC last longer and perform better over time.
Types of PC Cooling Systems
1. Air Cooling
- Components & How It Works: Air cooling uses heat sinks attached to components (like CPUs and GPUs) combined with fans to dissipate heat. The heat sink’s metal fins increase surface area, allowing heat to transfer to the air, which the fans then expel out of the case.
- Pros:
- Generally affordable and easy to install
- Low maintenance with minimal risk of leaks
- Reliable and widely compatible with most cases
- Cons:
- Can be bulky and limit RAM or GPU clearance
- Less effective in overclocked or high-TDP setups
- Can be noisier depending on fan quality and speed
2. Liquid Cooling
- AIO (All-In-One) vs Custom Loops:
- AIO coolers are pre-assembled, sealed units with a pump, radiator, and tubes, offering a neat, plug-and-play solution.
- Custom loops involve individually selected components (pump, reservoir, tubing, blocks, radiator) tailored for maximum cooling and aesthetics.
- Benefits:
- Superior heat dissipation compared to air cooling
- Quieter operation due to larger radiators and slower fans
- Allows for overclocking and compact builds without bulky heatsinks
- Drawbacks:
- Higher cost and complexity, especially for custom loops
- Risk of leaks and pump failures (rare with quality AIOs)
- Requires more maintenance (custom loops)
3. Passive Cooling
- Ideal Use Cases & Limitations:
- Uses large heatsinks without fans to dissipate heat silently.
- Perfect for low-power or silent builds, like home theater PCs or basic office rigs.
- Limited cooling capacity—unsuitable for gaming or high-performance systems.
4. Hybrid Cooling Systems
- Combining Air and Liquid Cooling:
- Some setups use liquid cooling for the CPU and air cooling for other components (VRMs, GPUs) or case airflow.
- This approach balances cooling performance, noise, and cost.
- Hybrid coolers (like AIOs with integrated fans on GPU blocks) are becoming popular for compact high-performance builds.
Components of a Cooling System
Heat Sinks and Fans
- Heat Sinks: These are metal blocks, typically made from aluminum or copper, that attach directly to heat-generating components like the CPU or GPU. They absorb heat and increase surface area for better heat dissipation.
- Fans: Fans work alongside heat sinks by moving air across the fins to carry heat away from the component and out of the case. Fan size, speed, and quality affect airflow and noise levels.
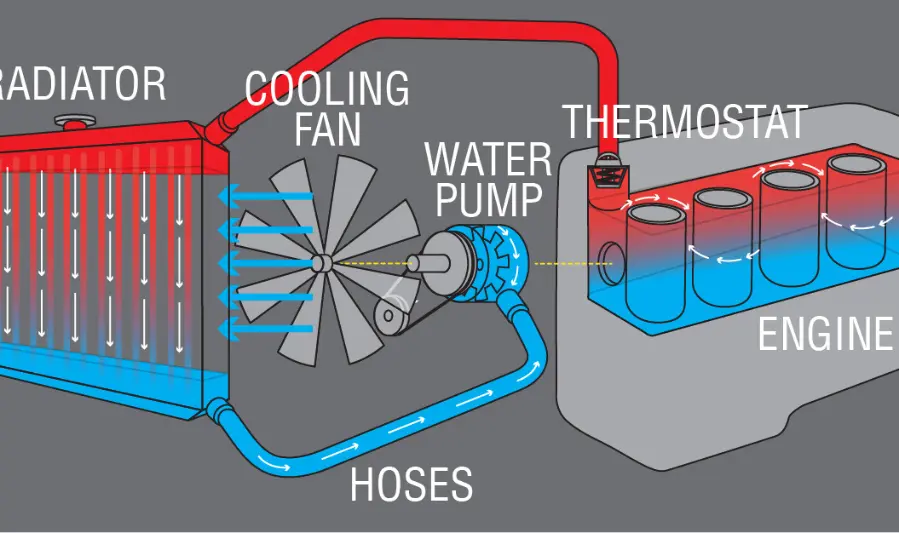
Radiators and Pumps (for Liquid Cooling)
- Radiators: In liquid cooling setups, radiators act like giant heat sinks, using liquid coolant to transfer heat away from components to the radiator’s surface, where fans blow the heat out. Radiators come in various sizes (120mm, 240mm, 360mm, etc.) depending on cooling capacity.
- Pumps: Pumps circulate the coolant through the system, moving it from the water blocks (on CPU/GPU) to the radiator and back. Reliable pump performance is crucial for efficient liquid cooling.
Thermal Paste and Its Role
- Thermal paste (also called thermal compound or thermal grease) fills microscopic gaps between the CPU/GPU heat spreader and the heat sink to improve heat transfer.
- Applying an even, thin layer of thermal paste ensures optimal contact and prevents hotspots that can cause overheating.
Fan Controllers and Monitoring Tools
- Fan Controllers: These hardware devices or motherboard software allow users to adjust fan speeds based on temperature, balancing cooling performance and noise.
- Monitoring Tools: Software utilities (like HWMonitor, SpeedFan, or proprietary motherboard apps) track temperatures, fan speeds, and pump status, helping users keep their system running safely and efficiently
you may also like to read these posts:
Best Motherboards in 2025: A Complete Comparison Guide
SSD vs HDD Performance Comparison: What You Need to Know
Fastest RAM in 2025: Best Memory Modules for Speed
Ultimate Guide to Cooling Systems for PCs: Choosing the Right Setup
How to Choose the Right Cooling System
Assessing Your PC’s Workload and Performance Needs
- Light Tasks (Browsing, Office Work): A basic air cooler or even stock coolers are usually sufficient since these tasks generate minimal heat.
- Gaming and Moderate Use: Consider mid-range air coolers or entry-level AIO liquid coolers to handle higher thermal loads and maintain stable performance.
- Overclocking and High-End Builds: High-performance air coolers or advanced liquid cooling (custom loops or larger AIOs) are recommended to efficiently manage heat and avoid throttling.
Budget Considerations
- Air coolers offer excellent value for money and often deliver great performance for most users at a lower cost.
- AIO liquid coolers are pricier but provide better thermal performance and quieter operation.
- Custom loops are the most expensive and complex but offer top-tier cooling and customization options.
- Factor in maintenance costs and potential upgrades as well.
Compatibility with CPU Sockets and Case Form Factors
- Ensure the cooler supports your CPU’s socket type (e.g., LGA 1700, AM5).
- Check physical dimensions—tall air coolers might not fit in smaller cases or could interfere with RAM slots.
- Radiator sizes for liquid cooling need compatible mounting points in your case (e.g., 240mm or 360mm).
- Measure clearance for GPU and other components to avoid installation issues.
Noise Level Preferences and Ambient Environment
- If you prefer a quiet PC, liquid cooling or large, slow-spinning fans are better choices.
- For noisy environments or where silence isn’t critical, standard air cooling is often sufficient.
- Consider additional noise damping features or soundproof cases if needed.
- Ambient room temperature affects cooling efficiency—warmer rooms may require more robust cooling.
Installation and Maintenance Tips
Step-by-Step Guide for Installing Air and Liquid Coolers
Air Cooler Installation:
- Prepare the Motherboard: Remove the existing cooler and clean off old thermal paste.
- Apply Thermal Paste: Apply a small pea-sized dot or thin line of thermal paste on the CPU heat spreader.
- Attach the Cooler: Mount the air cooler’s bracket or backplate as per instructions, then secure the heatsink firmly but evenly onto the CPU.
- Connect the Fan: Plug the cooler’s fan into the CPU fan header on the motherboard.
- Check Clearance: Ensure the cooler doesn’t obstruct RAM or GPU slots.
Liquid Cooler Installation (AIO):
- Mount the Radiator: Install the radiator and fans in your case’s compatible mounting points (top, front, or rear).
- Install the Pump/Water Block: Apply thermal paste to the CPU, then secure the pump/block onto the CPU socket as per manufacturer instructions.
- Connect Pump and Fans: Plug the pump and radiator fans into appropriate motherboard headers (usually CPU_FAN and AIO_PUMP).
- Cable Management: Tidy cables to ensure unobstructed airflow inside the case.
- Test: Power on and monitor temperatures to ensure everything is running correctly.
Best Practices for Applying Thermal Paste
- Use a small amount (pea-sized or rice grain) in the center of the CPU.
- Avoid over-applying; excess paste can reduce heat transfer efficiency.
- Some prefer a thin line or cross pattern—both methods work if the paste spreads evenly under the cooler.
- Clean old paste with isopropyl alcohol and a lint-free cloth before applying fresh paste.
Regular Maintenance Routines to Ensure Optimal Cooling
- Clean Dust: Regularly remove dust from fans, heatsinks, and radiators using compressed air or a soft brush.
- Check Fan Operation: Ensure all fans spin freely and replace any that are noisy or failing.
- Monitor Temperatures: Use software tools to track CPU and GPU temps, especially after upgrades or changes.
- Inspect Liquid Coolers: For custom loops, check coolant levels and tubing for leaks; AIO units require less frequent maintenance but keep an eye on pump noise or performance dips.
Troubleshooting Common Cooling Issues
- High Temperatures: Check for proper cooler installation, thermal paste application, and dust buildup.
- Noisy Fans or Pump: Adjust fan curves via BIOS/software or replace faulty fans/pumps.
- Overheating After Upgrades: Ensure compatibility and correct mounting of new components.
- Leaks (Liquid Cooling): Immediately power down and inspect for damage; leaks are rare in quality AIOs but more common in custom loops.
Optimizing Airflow in Your PC Case
Importance of Intake and Exhaust Fans
- Balanced airflow is key to effective cooling. Intake fans pull cool air into the case, while exhaust fans push hot air out.
- A typical setup uses front or bottom fans for intake and rear or top fans for exhaust, creating a smooth airflow path that prevents heat buildup.
- Positive air pressure (more intake than exhaust) helps reduce dust ingress, while negative pressure can improve heat expulsion but may draw in more dust.
Cable Management for Better Airflow
- Neatly routing cables behind the motherboard tray or using cable ties reduces obstructions that block airflow.
- Avoid cable clutter near intake fans and heatsinks to maintain unobstructed air paths.
- Good cable management not only improves cooling efficiency but also makes maintenance easier and enhances the build’s aesthetics.
Choosing the Right Case for Optimal Cooling
- Look for cases with good ventilation—mesh front panels and multiple fan mounting points.
- Cases with support for larger radiators and multiple fans offer greater cooling flexibility.
- Size matters: larger cases generally allow better airflow and component spacing but ensure compatibility with your motherboard and workspace.
- Consider cases with dust filters on intakes to keep components clean without sacrificing airflow.
Monitoring and Testing Cooling Performance
Recommended Software Tools for Temperature Monitoring
- HWMonitor: Provides detailed real-time temperatures for CPU, GPU, motherboard, and drives.
- Core Temp: Focused on CPU temperature monitoring with a simple interface.
- MSI Afterburner: Popular for GPU monitoring and fan control, also offers CPU temps and usage stats.
- NZXT CAM and Corsair iCUE: For users with compatible hardware, these apps monitor temps and control fans/pumps.
- HWInfo: In-depth hardware monitoring, including voltages, fan speeds, and temperature sensors.
How to Perform Stress Tests Safely
- Use programs like Prime95 or AIDA64 for CPU stress testing, and FurMark or 3DMark for GPU.
- Monitor temperatures closely during testing and be ready to stop if temps approach critical limits (typically above 85-90°C).
- Run stress tests in short intervals (10-15 minutes) initially, then gradually increase if temperatures stay safe.
- Ensure your cooling system is functioning optimally before starting stress tests.
Interpreting Temperature Readings and Adjusting Cooling Accordingly
- Idle Temps: Typically 30-45°C for CPU/GPU; higher may indicate poor cooling or airflow issues.
- Load Temps: 65-80°C under full load is normal; sustained temps above 85°C suggest cooling inefficiency.
- If temps are too high, consider improving case airflow, reseating coolers with fresh thermal paste, or upgrading your cooling solution.
- Adjust fan curves in BIOS or software to ramp up cooling under load while balancing noise levels.
Future Trends in PC Cooling
Innovations in Liquid Cooling and Hybrid Systems
- Advanced Custom Loops: Expect more modular, easier-to-build custom loops with quick-connect fittings and improved leak prevention, making liquid cooling accessible to a wider audience.
- All-in-One (AIO) Evolution: Next-gen AIO coolers will feature smarter pumps, quieter operation, and integration with RGB and monitoring software for enhanced user control.
- Hybrid Cooling Systems: Combining air and liquid cooling elements will become more common, optimizing performance and noise—for example, liquid-cooled CPUs paired with advanced air-cooled GPUs or vice versa.
Emerging Materials and Technologies for Heat Dissipation
- Graphene and Carbon-Based Materials: Researchers are exploring graphene’s exceptional thermal conductivity to create thinner, more efficient heat spreaders and thermal interface materials.
- Phase-Change Materials (PCMs): These absorb and release heat by changing states, offering new ways to manage thermal spikes in demanding workloads.
- Microfluidics and Nanoengineering: Using microscopic channels and nanostructures to improve coolant flow and heat transfer at the component level.
Impact of New CPU and GPU Designs on Cooling Requirements
- Increased Power Density: As CPUs and GPUs pack more transistors in smaller areas, they generate more heat per square millimeter, demanding better cooling solutions.
- Chiplet Architectures: With multiple chiplets connected on a single package, cooling strategies must address uneven heat distribution across the chip surface.
- Integrated Cooling Solutions: Some future processors may come with built-in cooling enhancements, such as embedded vapor chambers or direct liquid cooling-ready designs, simplifying system builds and improving thermal performance.
Faqs:
How often should I clean my PC’s cooling system?
It’s recommended to clean your PC’s fans, heat sinks, and filters every 3 to 6 months to prevent dust buildup and maintain efficient cooling.
Is liquid cooling better than air cooling?
Liquid cooling generally offers better cooling performance and quieter operation, but it’s more expensive and complex to install compared to air cooling.
Can I use the same CPU cooler when upgrading my processor?
It depends on the CPU socket compatibility. Always check if your cooler supports the new processor’s socket before upgrading.
What are the signs that my PC’s cooling system is failing?
Signs include unusually high temperatures, frequent system crashes, loud fan noises, or the PC shutting down unexpectedly due to overheating.
How loud should a PC cooling system be?
A good cooling system should be quiet enough not to distract you during normal use. Excessive noise may indicate fan issues or poor airflow.
Conclusion:
Choosing the right cooling system is essential to keep your PC running efficiently and prolong its lifespan. Whether you opt for air cooling, liquid cooling, or a hybrid setup, understanding your system’s needs and maintaining proper airflow will help prevent overheating and ensure optimal performance. With the right cooling solution in place, your PC can handle demanding tasks smoothly and stay reliable well into 2025 and beyond.